Acoustic Guitar Fingerpicking lessons
Hey, everyone. I'd like to digress a bit in this blog post. For the past few lessons, I've been writing about arpeggios across the fretboard. This time, I'd like to discuss basic fingerpicking patterns.
One of the most rewarding musical experiences of my career occurred when I was playing classical guitar exclusively for about 10 years. The path was very demanding. The repertoire was a serious challenge, and I practiced anywhere between three to five hours a day.
The one thing I noticed about classical guitar that made it different from all the other styles was the emphasis on technique. Without certain fingerpicking techniques, you couldn't play the classical repertoire. Although I don't play classical guitar exclusively, and I certainly cannot practice up to five hours a day anymore, I still use certain techniques when I fingerpick — all of which I learned from studying classical guitar.
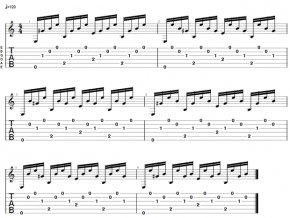
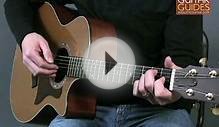
This is one of my favorite exercises to develop finger independence in the right hand.
In case you are new to fingerpicking, the fingers on the right hand now have letters to denote which finger patterns you will play in a particular section. The thumb is p, the index finger is i, the middle finger is and the ring finger is . So the right hand now spells out pima.
Get used to it. You'll be seeing a lot of this.
We usually don't use the pinky for typical fingerpicking patterns and songs. In this exercise, we finger an open E major chord. We place the "i finger" on the third string, the "m finger" on the second string and the "a finger" on the first string. We do not move these fingers from these strings! Pretend they are cemented there.
The "p finger, " thumb, will start on the sixth string but will float from the sixth, fifth and fourth strings according to the pattern. There are six patterns we will encounter during this exercise: pima, pami, pmia, piam, pmai and finally paim. All these patterns are demonstrated consecutively in the example given.
For example, pima is in measure one, pami is in measure two, etc. Notice that the thumb, the bass note, moves from the sixth, fifth and foutth string and back again during this exercise. Although this exercise is written in 16th notes, it is very wise to play at a slow pace with a metronome set to about 70 bpm to begin. make sure every note is clear, even and in time. In the next blog post, we will expand upon this further.
As always, thank you for reading! Any suggestions or comments are always welcome. Now pick up that guitar and play, just like yesterday y'all ...
Guitarist Richard Rossicone is a veteran of the New York City and Long Island original and cover band scene. He's been playing since he was 8, when he attended his first concert (Kiss) and saw Pete Townshend smash a guitar. He has studied with various instructors over the years, which led him to a career in music therapy. He began his educational journey at Queensboro Community College, where the faculty introducing him to classical music. He received his associate's degree in fine arts in 1997 and went on to receive his bachelor's in music therapy in 2001 and his master's in music therapy from New York University in 2004. He's been Board Certified as a music therapist since 2002. Richard continued his studies at C.W. Post University, pursuing a second master's degree in classical guitar performance and music history, studying under Harris Becker. He's been teaching guitar, piano and theory since 2002 and in 2006 started his own company, Rossicone Music Studios. Visit him at Axgrinder.com and his Complete Guitarist Facebook page.
Traffic statsYOU MIGHT ALSO LIKE


Share this Post
Related posts
Fingerpicking guitar lessons for Beginners
In this exercise you will place your fingers on strings 1, 2 and 3, with your 1st finger plucking the 3rd string, 2nd finger…
Read MoreAcoustic Guitar Blues Lessons
Many of us studying blues guitar with Keith Wyatt know that blues came out of the African American experience of working…
Read More
